
What Does WearOS Look Like and How it Works – on a Fossil 6 Smartwatch

What does WearOS on Fossil Watch 6 look like, how do you operate it and how do you configure it? In this blog we are going to talk about some of main interfaces of WearOS such as Faces, Menu, Tiles, Control Center and Navigation, as well as how do you configure watch faces and tiles.
If you prefer reading the article please continue below the video.
Navigating WearOS
 The Fossil 6 smartwatch has a rounded touch screen and three physical buttons: the crown in the middle that also works as a button, and two other buttons above and below the crown.
The crown acts as the main button that lets users access the main menu which includes all the apps.
The top button is used to access the most recent apps, whereas the bottom button is configurable, in our case we have it set to access the wellness stats.
The top button and the crown are also configurable for double tapping and long pressing respectively. In our case the double tap for the middle button or the crown is configured to access Google Wallet.
Main interfaces of WearOS
So what is WearOS made of? WearOS is made of the Watch Face, Tiles that are somewhat like Widgets in smartphones, the Main Menu that includes apps and settings, Control Center, and Notifications. Optionally, the lock screen can appear if you decide your watch to be locked. We will talk more about each of these interfaces below.
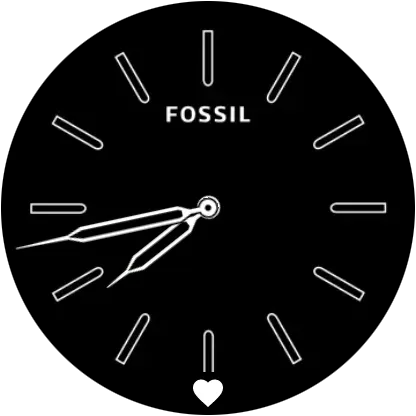
Faces
The watch face in WearOS is the default screen – this is the home screen. Faces are configurable and depending on the face there will be different configurations. We talk more about configuring watch faces below.
Main Menu
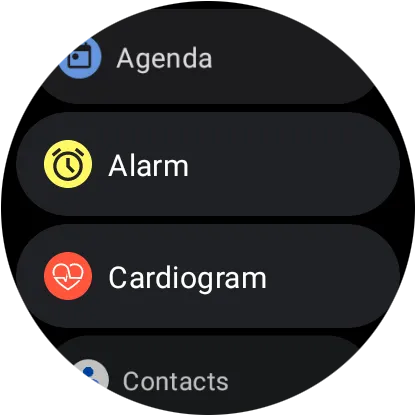
To access the main menu or all apps, users press the crown. Apps are displayed in a list view, with icons on the left and names to the right, which looks nice and is easy to see what you are looking at. You can swipe up or down or spin the crown to scroll through apps. You press the crown again to go back to home or the Watch Face.
Tiles
Swiping left or right takes users to tiles. Tiles preconfigured interfaces that are available from the WearOS settings and apps. Tiles include information such as the weather, heart rate, sleep tracking times, outdoor activities, timers, alarms, calendar events from your phone, and more.
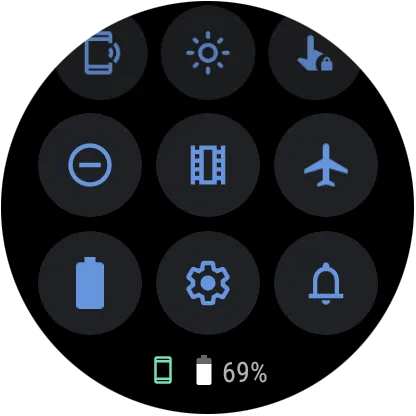
Quick Access Settings (Control Center)
Swipe down from the top of the screen or spin the crown towards you to access the WearOS Quick Access Settings. That’s the same as in Android OS, except that the Control Center provides a better UX on WearSO (read our critical review on that or watch video). The Quick Access Settings in WearOS is nicely designed and easy to use. It includes 11 icons for some of the most used settings such as flashlight, Google Pay, Find My Phone, Brightness, Lock Screen, Do not disturb mode, Vibrate mode, Airplane mode, Battery Modes, Settings and Sound mode. Quick Access Settings icons are not configurable.
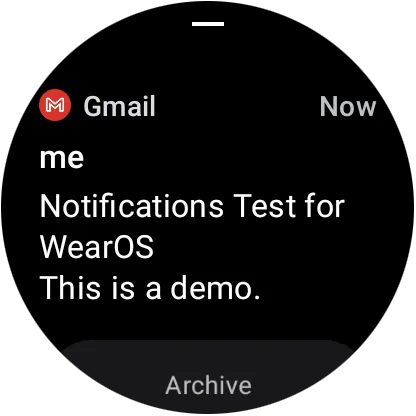
Notifications
Swipe up from the bottom of the screen or spin the crown away from your body to see notifications. When there are unread notifications a dot at the bottom of your screen. Swipe over notifications left or right to remove them, or click over them to access them. It there are many notifications, there is a Clear All button to easily remove all notifications.
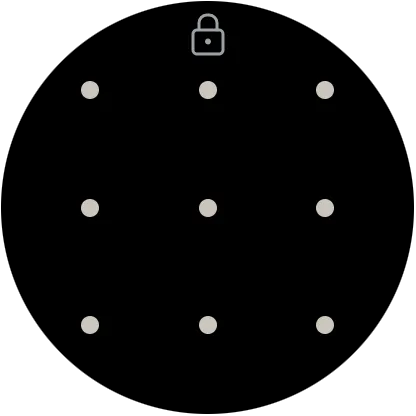
Lockscreen
When locking is enabled in your WearOS based smartwatch, users can set a pin or a pattern that will appear when you are not wearing your watch.
Watch Settings
Watch settings are nicely designed on a list view similar to the main menu. Settings are grouped into fifteen items. Finding particular settings is easy as there aren’t as many configurations as there might be in Android smartphones. Speaking of configurations, that brings us to the next section in this blog which is about configuring watch Faces and Tiles in WearOS.
Configuring Face and Tiles in WearOS
How to change Faces
Press and hold over a watch face to select from available watch faces or configure the existing one. You can swipe left and right to choose from available faces. Or you can press the pen icon to edit the selected face. Depending on the face, you can change color, font style, information included on a face, and or complications for most analog looking faces. Complications are small icons that act like shortcuts or contain information such as battery percentage, date, heart rate and many other shortcuts.
How to change Tiles
Similarly to watch faces you can configure tiles. First you slide left or right from the face view to go to tiles, then press and hold over a tile to go to the rearranging mode. You can’t edit the actual tiles but you can rearrange and organize them for quick access. To change the position simply slide through tiles to select the one you want, then press the arrow on the bottom of the screen to move its position. To add a new tile from all the available tiles, press the plus button. To delete a tile from active tiles on your watch, swipe over a tile when you are in edit mode.
The App
All configurations can also be done through the Fossil Smartwatch app from iOS or Android smartphones.